Why Fencing Is a Necessity

In crime, a fence buys stolen goods from a criminal and sells them for profit. Fencing is a severe crime, and law enforcement works hard to tackle it.

Fences

Whether you want to prevent criminals from trespassing or children and pets from accidentally wandering into a lake or off of a cliff, a fence can establish your property lines. Contact Fencing Company Charlotte NC now!

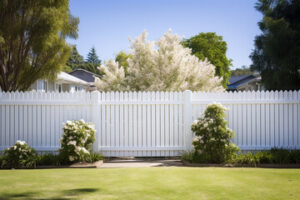
Privacy is a precious commodity in the modern world, and a privacy fence can give you back some control over your property. No more nosy neighbors peeking in to see your backyard pool or glancing over at your kids and pets playing in the yard. A privacy fence can also block out unwanted noise, like traffic and voices from the street or nearby homes.

While a privacy fence can be a beautiful addition to any home and landscape, it is important that you choose one that balances beauty and functionality. Adding decorative elements to your privacy fence can help enhance its aesthetic without compromising its primary purpose. For example, using wrought iron post caps can add style and flair to a standard wood or vinyl fence. They also protect the tops of your fence posts from damage and weather.

Another way to add privacy and style to your privacy fence is by using lattice panels on the top. Adding these decorative elements can increase the height of your fence from the standard six feet, but still allow airflow and light into your yard. This is a great option for homeowners who want to increase their privacy, but don’t want to spend the money on a higher-end fence.

A privacy fence can also block out wind and sunlight, which can save you money on your energy bills. In the summer, a privacy fence can keep your outdoor space cooler by blocking out the hot sun and in the winter, a privacy fence can block cold winds from blowing through your home.

Many local governments and homeowner’s associations have rules governing the type of fence that you can install, including the height and materials used. Before starting construction, make sure you review any guidelines in your area to avoid potential problems. In addition, some areas require a permit before building a fence taller than six feet. A permit can delay the installation process and increase your overall cost. Finally, if your home is located near utility lines, it’s important to contact the company that runs them to find out where the lines are buried. This will help you avoid digging into or cutting into power lines that could cause a costly outage.

Security

A fence offers protection against things like burglars, wild animals, and loud neighbors. It is also a great way to keep people from entering your property without your permission. Fences are also often used to protect against high winds. This is because wind can damage a home or business, especially if it has to push through something taller than your yard. A fence can block the wind and prevent it from getting through the wall.

Fences can also protect us from the effects of sunlight, such as UV rays. These rays can damage the skin, so it is important to protect yourself from them when spending time outside. Fences can block the sun’s harmful rays and help you enjoy your outdoor space without worrying about the damage they may cause.

The term fence can also be used to describe a criminal who buys and sells stolen goods. This activity is known as fencing and it is a significant part of many criminal enterprises. The prices that fences pay thieves depend on norms and legitimate market rates for the items in question, as well as the thief’s reputation. Habitual thieves who are known to police may also face a higher risk of being caught if they attempt to sell their stolen goods directly to buyers, so they often establish clandestine relationships with fences in other locales to avoid this risk.

When installing a fence, most homeowners focus on the panels that will best suit their home’s style and desired level of privacy. However, the integrity and longevity of a fence hinges on the stability of the posts that support it. Without proper protection, these posts can become damaged or even collapse. Quality Full Post Protectors from Fence Armor can help ensure that your fence will stand the test of time and resist rot, water, and other damaging environmental elements.

One of the most effective ways to protect wood fence posts from moisture is by staining them. Stains contain:

  • Pigments that add color.
  • Resins that protect the wood from moisture.
  • Additives that improve the finish performance of the stain.

Regular maintenance and reapplication of stain will safeguard your fence against moisture and UV rays and extend its lifespan.

Weed Control

Weeds compete with crop plants for sunlight, water and nutrients. Without control, they can take over entire fields, hampering the harvest. Farmers use a combination of chemical and nonchemical methods to achieve effective weed control. Nonchemical methods include cultivation, use of mulches and physical removal of weeds by hand. Chemical weed control involves the application of herbicides to the soil or weeds, killing them with a targeted agent. Many herbicides are designed to be specific to the weed species they target, so they cause no harm to the crop plants. The goal of chemical weed control is to kill the weeds before they produce seed and spread to other areas of the field.

Weed control is most effective when used at the beginning of a growing season, before the weeds have a chance to establish themselves and grow large. Weeds can quickly produce thousands of seeds, which will then enter the soil and become a problem for future crops. The weeds may also serve as a host for crop diseases and pests. Weeds should be removed regularly to prevent the production of seeds.

Cultivation is one of the most important preventive weed control methods. It should be done at a time when it is most effective, based on the stage of weed growth and the stage of crop development. Cultivation is best done using equipment that can operate in close proximity to the crop.

Herbicides are the most common tool used in chemical weed control. They are applied to the soil surface or transported with plant roots to metabolic sites, where they inhibit photosynthesis. There are a wide variety of chemicals available for this purpose. Newer herbicides have fewer side effects and less environmental impact than older chemicals.

A chemical called glyphosate is the most widely used herbicide in the world. 

It’s important to find a local fence company that provides professional maintenance services at an affordable price. When evaluating prospective companies, be sure to ask about their licensing and insurance coverage, as well as request references from past clients. These factors can give you a better idea of the type of work they perform and the level of customer service they provide. A reliable fence company will have the experience and expertise necessary to provide you with the best maintenance services for your fencing needs. In addition to providing quality maintenance, a trustworthy fence company will also offer installation services for new fencing and replacement of existing structures.

A well-installed fence is an important investment in the security and curb appeal of your property. However, over time, even the best-made fences will begin to show signs of wear and tear. This may mean discoloration, rotting, or warping. Depending on the severity of the damage, you may need to have it repaired or replaced entirely. In some cases, a full fence replacement is more cost-effective than simply replacing damaged panels.

Before you hire a fencing contractor:

  1. Make sure that they have the proper licensing and insurance. You can usually verify this information by entering the contractor’s name into a search engine or asking them directly.
  2. Check references and get quotes from several different companies to compare prices.
  3. Beware of fly-by-night contractors who change their names to avoid bad reviews.

In addition to ensuring that the contractor has the right credentials, it’s also important to choose quality materials for your fence. For instance, if you’re building a wood fence, Mr. Meza recommends choosing kiln-dried redwood or cedar instead of pressure-treated lumber. He also recommends choosing galvanized nails rather than staples to ensure that the nail heads hold up over time.

You should also make sure that the fence is built completely within your property line. If it’s not, you could face fines and other legal problems. Lastly, it’s important to communicate with your neighbors throughout the process so that everyone is on the same page and understands what’s going on.

The first step in the installation process is to plan where you want your fence. Once you’ve done this, it’s a good idea to call your local utility company to have any underground lines marked before digging your post holes. This will help you avoid hitting any electrical, plumbing, or gas lines, which can cause serious damage and lead to a costly repair bill.

Once the fence is installed, it’s a good idea to fill in the old posts and tamp the ground down to prevent settling. It’s also a good idea to paint or stain the fence to protect it from the elements and prolong its lifespan.

The Basics of Hardwood Floor Refinishing

Hardwood Floor Refinishing NJ adds value and beauty to your home. However, it can be a challenging project to complete without professional assistance.

Hardwood

Whether you DIY or hire a contractor depends on your comfort level, skills, and time. If you decide to do it yourself, follow the steps below:.

One of the most critical steps in the hardwood floor refinishing process is sanding. Whether you’re dealing with major scratches, gouges or dents, or just need to get rid of that pesky dirt buildup, a thorough sanding will help restore the surface of your hardwood floors to a smooth, even texture. Sanding can be time-consuming and messy, but it’s essential for a successful refinish job. For the best results, it’s recommended that you have a professional do the work. They know the equipment, the chemicals and how to deal with the mess. Plus, they have a lot of experience doing the same thing every day and know what to expect.

Once the sanding is complete (which can take 2+ days depending on your space), it’s time to stain. Before your refinisher starts, talk to them about the look you want and bring in some samples of stains for them to test on your flooring so they can get an idea of what will work. Then, once the stains are on your flooring and you’re happy with them, they’ll finish up the project with two to three coats of polyurethane. For the best results, it’s important that you keep rugs and furniture off of the floors until the finish has had a chance to cure completely. During this time, it’s also a good idea to open as many windows and doors as possible to help reduce the odor of the polyurethane fumes.

If your flooring is already finished, but it has significant scratches or dents, you may be able to simply reseal them. Resealing creates a thin layer of protective liquid over the top of your hardwood floor, which will allow its natural color and grain to shine through while providing some protection. It is recommended that you reseal your floors once every six to 12 months, depending on traffic use.

If you’re interested in sanding and staining your own floors, check out our DIY guide here. While the logistics can be tricky and the products can be messy, there’s a certain satisfaction to taking on this epic home improvement project yourself! Just be sure to research the proper products and techniques, as well as the appropriate tools.

Staining

After the sanding process is complete (which can take 2+ days), it is time to stain the floors. This is the fun part of refinishing hardwood floors because you can choose what color and tone you want your wood to be. It is best to test stains before starting the job to make sure you get the right shade that goes well with your home design and furniture. The floor guys will usually have several samples they can show you but doing your own research is also a good idea.

Depending on the type of stain you select, it may require more than one coat. Allow each coat to dry according to the manufacturer’s instructions. You should also assess the color after each coat to make sure you are getting the desired look.

Stains are available in a wide range of colors to complement any décor. They also come in various sheens, ranging from matte (low luster) to high-gloss. The sheen you select will determine how much light the floor reflects, and can hide minor scratches and other imperfections.

The most popular choice for a stain is an oil-based formula. Oil stains offer rich, warm tones that enhance the natural beauty of wood. They can be applied with a brush, roller or applicator pad. If you decide to use an oil-based stain, it is a good idea to open windows and turn on fans for proper ventilation, as these types of stains can produce strong fumes.

Water-based stains are an alternative to oil stains. They tend to dry faster and clearer than oil-based stains and emit lower odor. They can be applied with a brush or roller and are suitable for almost any type of hardwood.

Once the stain has dried completely, it is time to apply a protective finish. The clear sealant will help protect the wood from water damage and everyday wear and tear. A protective finish can also add a nice sheen to the floors, which can brighten and beautify the space.

Generally, a protective finish will need to be reapplied every few years. The sheen will diminish over time, and it may need to be reapplied more frequently in high-traffic areas. Once the protective finish is applied, the floors will be ready for you to start moving furniture back into the room.

Sealing

When sanding and staining are complete, you can apply your top coat. This will protect the hardwood from water and daily wear, and it will add a hint of color, too. The most common type of top coat is polyurethane, which comes in a range of sheens from matte to high-gloss. However, other options are available as well, such as acrylic or natural oil-based products. The sheen you choose will depend on the amount of light you want your floor to reflect, though it is important to keep in mind that higher sheens are more slippery and can magnify minor scratches and dings.

A polyurethane finish is durable, and it will help your floors resist dirt, moisture, and other environmental pollutants. It will also keep your wood looking nice for many years to come. To make sure your new finish will hold up to regular use, you should reseal your floors every six to 12 months.

If you have young children or pets, you may need to reseal them more frequently. To minimize the time between resealing, you should vacuum and mop your floors regularly. Also, try to limit the amount of water you spill on your floors. It’s best to clean high-traffic areas once weekly, and other areas once a month.

Although refinishing is more labor-intensive than resealing, it’s the only way to restore severely damaged or worn wood. If your floors are in good shape, resealing is the more economical choice.

Before refinishing begins, it’s a good idea to remove any furniture and drapes from the room. The refinishing process can create large amounts of dust, so it’s also a good idea to block vents with painter’s tape and seal doorways with plastic sheeting.

While refinishing can be done yourself, it’s a big project and requires the proper tools and equipment to do so properly. If you aren’t comfortable performing this job yourself, call a professional. A reputable contractor will have the experience and tools to get the job done right and protect your investment. These professionals work on floors all day, every day, so they know the ins and outs of how to refinish hardwood. They can help you pick a stain color and style that will compliment your home, and they can show you samples so that you’re confident in your purchase.

Painting

Refinishing is a great way to breathe new life into hardwood floors. It can make them look elegant and fresh, and it protects the flooring from damage and stains. However, it can be a time-consuming and expensive project. In addition, the sanding process can be very messy, so it’s best to hire a professional for this task.

The first step in painting your hardwood floor is to clean the area thoroughly and remove any existing stain or polyurethane finish. This step is essential for a smooth and even finish, and it should be done with a vacuum or dust mop. Then, sand the floor to create texture and roughen up the surface for the primer. It’s also a good idea to wear a dust mask during this stage of the process. If you have an HVAC unit in your home, cover it with plastic and turn it off so that the sanding process doesn’t circulate dust into other areas of the house.

Once the sanding and staining processes are complete, you can apply the final coating to your hardwood floors. This coat helps to protect the surface and can be applied in a variety of sheens, from matte (low luster) to high gloss. The choice of sheen is a personal preference, and it depends on how much light you want the wood to reflect.

During the coating stage, you’ll need to follow the manufacturer’s instructions for application and drying times. It’s important to be off of the wood floors during this time, and you may need to move your furniture out of the room. It’s also a good idea at this point to clear the room of any debris, and you should cover any vents in the room to prevent them from becoming clogged.

Painting isn’t a necessary step in hardwood floor refinishing, but it can be an effective way to create a unique look or change the color of your floors. However, painted floors could decrease the resale value of your home, so it’s generally better to leave this task to professionals unless you’re comfortable with DIY work.

Things to Keep in Mind Before You Start a Bathroom Remodeling Project

Remodeling a bathroom is a big investment. Here are a few things to keep in mind before you start. It’s important to consider resale value when choosing materials for your bathroom. For example, using durable, water-saving fixtures can help future homeowners save money and reduce their carbon footprint.

Other resale-boosting ideas include a neutral color palette and a wall-hung toilet. Visit Bathroom Remodeling Lexington KY for more information.

Budget

bathroom

The first step in any remodeling project is establishing the budget. For many homeowners, this is the hardest part. Often, a homeowner has a set vision for what they want the bathroom to look like, and this makes it difficult to put it into a practical context for how much it will cost to accomplish that goal. It’s also important to remember that a stellar bathroom does not have to cancel out other plans for the home, so be realistic about how much you can spend.

One of the best ways to control costs is by choosing less expensive materials for the remodel. This is especially true for flooring and countertop. A savvy contractor can help you find quality options that fit your budget.

Another major component of the budget is labor costs. A professional remodeling company will be able to estimate labor costs for the entire project, but it’s also worth talking to individual contractors to see what they charge for a standard job. Savvy homeowners can also ask their contractor what they can do themselves to cut back on labor costs, such as painting.

It’s a good idea to have 5-10% of the total budget available for contingencies. No matter how carefully you plan, unforeseen circumstances can creep into projects. For example, water damage behind walls can dramatically increase the costs of a remodel. Other issues that may add to the cost include changing project timelines, plumbing emergencies, and the need to purchase new materials when your original selections are not in stock. A skilled bathroom remodeling contractor can manage these situations to keep your remodel on budget and on schedule.

Layout

One of the biggest stumbling blocks in a bathroom remodel is dealing with existing plumbing. Moving pipes is costly and labor intensive. So, when planning your new layout, it is best to stick with a design that doesn’t require the relocation of existing hookups and drains.

Once you’ve figured out how much space you can work with, it is time to start thinking about what will be in your new bathroom. The’must haves’ include items like a toilet, shower, tub, and sink. You may also want to consider adding a bidet or a hand-free faucet to enhance functionality. You might also choose to add features for convenience such as a built in hair dryer, heated towel rails, or a smart mirror.

Finally, you’ll want to add some bespoke elements such as artwork or ornamental tiling to give your bathroom character and personality. It is also a good idea to incorporate some smart technology such as a hands-free faucet or a programmed shower system to increase convenience and save energy.

As you finalise your bathroom plans, make sure that you get quotes from several different contractors. It is a good idea to discuss your budget with your contractor as early in the process as possible so they can help you stay within your price range. It is also a good idea to leave room in your budget for unexpected issues during the remodel. This is particularly important if you are doing major structural changes to the room, such as relocating the tub or shower.

Materials

If you want to upgrade your bathroom, consider the materials you will use for your vanity, shower and flooring. Choosing the right materials will help to ensure that your new bathroom will look great and last for years to come.

Glazed porcelain tile is a popular material for bathrooms because it is available in an almost unlimited variety of colors, patterns and styles. It is also water-resistant and has a low porosity that makes it essentially stain-proof. This versatile material can be used on floors, walls, countertops and backsplashes.

Another popular choice for bathrooms is natural stone, including granite, marble and travertine. These materials have a classic beauty that adds an elegant feel to any bathroom. These materials can be honed, polished or sanded to give them an extra level of sophistication. Natural stone counters are durable and easy to maintain, but they may require periodic sealing to guard against staining and moisture absorption.

Other flooring options for bathrooms include laminate, engineered wood and vinyl. Laminate is a budget-friendly option that comes in a variety of styles, from oak and cherry to walnut and mahogany. It is water-resistant and can be installed over existing tiles or other types of flooring. Engineered wood and vinyl are also waterproof and can be installed over a subfloor or existing tile.

Other materials you may need during a remodel include a new toilet, sink and tub plus any surrounds. Depending on your project, you may also need to purchase new drywall and electrical fixtures and switches. Consider adding a dimmer for your lights and recessed lighting around the mirror to better set the mood when you are taking a bath or applying makeup.

Lighting

A bathroom remodeling project should include a lighting upgrade. Older fixtures often use inefficient bulbs, but newer options are more energy-efficient and provide better light quality. You may also want to consider adding a dimmer for greater control.

Another crucial aspect of bathroom remodeling is installing the proper plumbing and electrical systems. This includes adding or modifying outlets and switching to GFCIs for added safety. A professional can help you make the right decisions based on your space and needs.

Bathrooms can feel cold and uninviting, so incorporating natural materials into your design helps create warmth. Natural-looking woods work well with a variety of styles, but it’s important to note that they do tend to absorb moisture more easily than other materials. As such, you’ll want to keep up with regular maintenance and cleaning.

Large, rectangular wall tiling is still the norm in bathrooms, but it’s no longer as trendy as it once was. It can give off a builder-grade vibe and lack personality, so opt for shapes that have more of a design punch.

Using a mirror as a focal point is another way to add interest and dimension. More homeowners are choosing frameless mirrors with LED lights, and they’re also selecting sconces and pendants that incorporate anti-fog technology.

Paint is a simple way to update your bathroom, but it’s important to test color swatches in your space to see how they look in the light of day. Natural light can drastically change how a color looks in your bathroom, and you don’t want to regret your choice later on. Likewise, be sure to test any new fixtures or finishes in your room before committing to them.

Accessories

As with any room in your home, bathroom accessories and decor can make or break the look of your space. Luckily, there are plenty of options that can help you create a custom bathroom remodel, within your budget.

For example, a new shower curtain can make a big difference in the look of your bathroom. It also serves as a practical barrier between your bathtub or shower and the rest of the room. Choose a color and material that complements your existing design.

Another simple but impactful upgrade is the addition of a backsplash behind your sink. There are many different materials to choose from, including tile and stone. These materials are available in a wide range of colors and textures, which allows you to match the backsplash to your bathroom design.

If you are looking for a way to add visual interest and texture to your bathroom walls, wallpaper is a great option. There are many styles to choose from, and peel-and-stick varieties are relatively easy for DIYers to install.

Lighting fixtures are another important part of your bathroom renovation. You can choose from recessed and pendant lights, wall sconces, and more. When choosing light fixtures, be sure to consider your energy needs. For example, switching to LED bulbs can significantly lower your energy costs while still providing enough light for your bathroom.

A bathroom can feel a little impersonal and uninviting without some sort of decor to add warmth and style. Adding a rug, towels, or art can bring life and a pop of color to the space. Incorporating natural elements like wood accents or stone details can also give the room a more organic feel.